Wednesday 31 October 2018

Multi-Layered Gelli® Mono-Print


I've just discovered a fantastic print artist from the UK called Rebecca Vincent. Make sure you check out her web page and You-Tube for amazing work. Rebecca uses oil based inks and a printing press to make her prints, I wanted to see if I could get something similar with the Gelli® plate and acrylics. The main disadvantage of using the acrylics is the fast drying time which means you have to work fast with your mark-making and you can't make anything too big. Despite the drawbacks I really like these landscape prints I made which remind me of the Pilbara in Western Australia.


Now I've got the hang of the technique I'll be trying some with my favourite images such as the tulips experiment below. Looks like I was a bit heavy handed with the black ink when adding the mono-print outline at the end; I'll use a stencil to mask out the background next time!


Sunday 28 October 2018

Sew Useful


I know how to make textile art. I know how to felt and dye, how to do machine embroidery, melt fabrics together, make quilts and all sorts of other textile creations. I'm embarrassed to say I have no idea how to make anything useful! I've never made clothing, home furnishings (except cushions), bags or accessories. I think it might have something to do with my inability to measure or cut straight!

Well I decided I might like to make some bags and You-Tube is always ready to help. I've started very simply with these drawstring bags. I've used some random hand-me-down fabric scraps that were lying about the place. I think now I've got the hang of them I'll use some of my more pretty hand dyed and decorated fabrics for the next batch.

I used tutorials from Made Everyday. The bag above is a simple drawstring with boxed corners. Here is the video:


The bag below is a simple drawstring bag that can also be worn as a backpack.


Wednesday 24 October 2018

Mark-Making, Pattern and Scale


This week's design exercise on DMTV is mark-making with ink and changing scale with a photocopier. This is only part of a huge pile of papers I now have ready for collage experiments.

Tuesday 23 October 2018

Breaking the Rules in Art


Artists have been breaking the rules for years. In fact I’d go so far as to say that breaking the rules is essential to becoming a successful artist. Many of the most famous artists broke the rules and were often considered shocking, inappropriate or just way too weird at the time! Many times their works were not considered good art until years later. These days we are more used to artists breaking the rules but still we can be shocked. Recently a Banksy painting spontaneously shredded itself immediately after being sold at auction. One look at the auctioneers face and you can plainly see first shock and then disapproval written all over it. However shortly afterwards the art critics were saying that the painting was probably now worth even more than before, I’m sure the shocked auction house would love to get their hands back on it again!

Painters and sculptors have been breaking the rules for years, however textiles artists are still playing catch up. This is in part due to certain very traditional textile organisations who, even in the very the recent past, found even things such as embroidery done by machine instead of by hand a mortal sin. Some people are still shocked and outraged at the use of glue and fabric in the same piece! Those working in textiles have a constant battle to get textiles recognised as art and not just a craft. This inability to break the rules perpetuated by textile organisations themselves has hindered the way forward. Thankfully most organisations are seeing the need for change, for attracting less traditional members and moving forwards whilst still keeping traditional skills alive.

Textile skills such as stitching, knitting and dressmaking are often handed down through the generations in a way that doesn’t happen with say painting, sculpture or photography. Textile skills, right up until recently, were essential for everyday living. Perhaps this is another reason why textiles are still widely regarded as a craft not an art form?

Many textile artists are now moving forwards and breaking the rules in new ways to discover fresh, exciting art pieces. However I think we have many years to go until textiles has the respect and value that other arts forms such as painting and sculpture currently enjoy.

Of course textiles can also be unforgiving and some rules really shouldn’t be broken – sewing through wet glue anyone, how about dyeing fabric without putting in your fixative? Perhaps you’ve tried to needle felt through metal (OK I haven’t actually done that but I’ve thought about it!). I think I find it easier to break the rules in textiles because, never having any formal training in textiles, I don’t actually know what the rules are. Often it’s only after something has gone disastrously wrong that I actually look up how you’re supposed to do it!

Today I’m breaking a quilting rule. Wadding is supposed to go in the middle of your quilt sandwich to give it that nice, soft, puffy effect, it’s not supposed to be seen on the outside. Well not anymore! Lately I’ve been using these lovely hand dyed pre-felts from The Thread Studio with my needle felting machine. They are fabulous colours but they are very expensive. It occurred to me that cotton wadding has a very similar texture to pre-felt and can also be hand dyed. I had a piece of screen printed wadding lying about the place so I decided to experiment and see if it would work with the needle felt machine. It certainly does! I’ve managed to felt wool and silk fibres, yarns, organza, acrylic felt, sari silk and wool felt into it. I have lots of spare dye left over from my last printing session so now I know the wadding is suitable for needle felting I plan to dye more and use it in my art work. What will the quilters think? Maybe the traditionalists will disapprove but I reckon my Contemporary Quilt Group will love it!


Monday 22 October 2018

PhotoShopping Flowers


Today I spent some time messing about with photos in PhotoShop. All the flowers and the lamp-post were shot at Araleun Botanic Park. I like how the lamp-post has a very similar shape to the tulip buds so I put it growing among the flowers. Then I changed up all the colours and added some filters.


Sunday 21 October 2018

Because Colour Makes Me Happy


My daughter says these hand-dyed fabrics are a bit fluro, a bit too bright! Is too bright actually a thing? I don't care, because colour makes me happy.

These samples were all done with procion dyes at a workshop with artist Linda Stokes. She said bring 2m of fabric - I think I printed about 6m! We used liquid as well as thickened dyes, brushes, rollers, stencils, stamps and texture plates. Some are more pleasing than others, but the less successful ones will probably get bleached or over printed.


Thursday 18 October 2018

Wallpaper Rubbings and Prints


I was in the DIY store and found some embossed wallpaper samples. I couldn't resist taking a collection home to experiment with. For these first few I took a rubbing with oil pastel and then washed drawing ink on top. Once it was dry I added details with bleach that turned the ink orange.


The backs of some were pretty interesting too.


I also tried making prints with my Gelli® plate. I rolled some paint onto the plate and pressed the wallpaper on top, some parts took up the paint whilst other parts resisted it.


I've also done some rubbings on fabric with Shiva sticks. They are now in a bath of purple dye. Check back soon to see how they came out.

How to Clean Your Gelli® Plate


Cleaning. Not the most interesting topic, and not one I usually give much thought to, but my Gelli® plates are in a really bad way! They've had lots of use lately in kids workshops and experiments. One had graphite stuck to it which I couldn't get off with anything. Perhaps you have the same problem? Here is the solution: baby oil.


Who knows what it's doing to skin if it removes paint and ink and graphite so well! Just rub a generous amount onto the plate with kitchen paper, adding more as needed until the stain is gone and then rinse with liquid soap.

Monday 15 October 2018

Recycled Bag


This week at Contemporary Quilters we were experimenting with old scraps to see if we could make a quilt from them. As usual I wasn't doing quite what I was supposed to be doing! I came across a waistcoat in the scrap pile. The shape made me think of a shoulder bag so I cut the back off and used the 2 side panels to make the bag modelled by my daughter above. One side is held together by the original buttons whilst the other is knotted fringes. Only the bottom section is sewn. I trapped some silk scraps in the bottom seam to make the fringe.


I did also start some scrap quilts, more to come on those soon.

Wednesday 10 October 2018

Art For Yourself, Art For Exhibition


I love making art. I'm drawn to it. It's a way of life, a passion. I get an idea and then I immediately have to drop everything and try it out. I feel compelled to share my experiments, techniques and ideas with others. I enjoy teaching adults and kids to make their own creations.

I like seeing my work in a gallery and of course enjoy spending any money from selling my work. But it's not the reason I make art, it's not my passion. Many times I don't care if an artwork ever progresses from an experiment to a finished piece or gets hung in a gallery.

My art group has an exhibition coming up next year with the theme "Contradiction and Contrast". I'm finding it very difficult to work within the theme - which is crazy because it was me that came up with the idea for the theme!

We've been working all year on expanding our ideas for our exhibition pieces. I've enjoyed this and have come up with some nice ideas but to me that's the exciting bit, having the ideas and making plans, now I'm ready to move onto something else. I need to act on my ideas almost immediately after having them or I get bored.

I enjoy being spontaneous in my art which keeps it fresh and exciting for me. I'm more interested in the process rather than what turns out at the end. Of course not planning anything has a few disadvantages too; like the piece ending up just a little too big or small for a frame, or the composition being not quite right, or one layer getting ruined by the next because I've done it in the wrong order. Textiles especially need a bit more planning than other things like art journals.

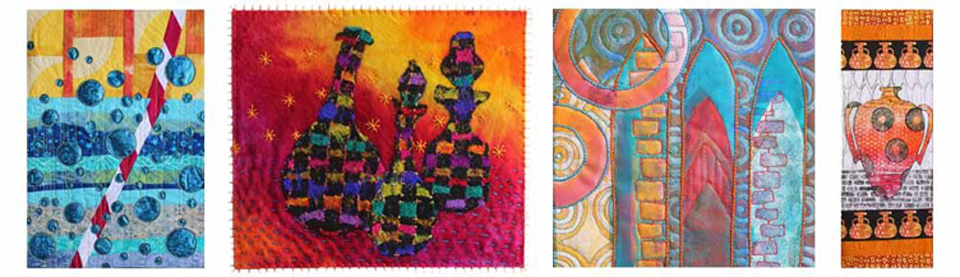
One of my most popular pieces of late, the woven sari bottles below, was totally unplanned. It went from an idea in the shower to being made almost immediately and I really enjoyed the process and how it turned out. It was clearly inspired by things I've been doing in my sketchbook but it was never planned or thought out. It has nothing to do with 'Contrast and Contradiction'! At this rate I'll have nothing for the exhibition. I wonder how important it is to stick with the theme of an exhibition? A theme seems to help many people develop an idea but for me I think making whatever comes to mind and then later seeing whichever exhibition it might fit into is a better way forward.


I'd love to know what you think. Do you like to plan or are you more spontaneous? What are the advantages and drawbacks? How (if at all) do you work towards an exhibition theme? Let me know in the comments below.

Monday 8 October 2018

No-Sew Fringed Cushion


Today I used up some hand-me-down knit fabric to make this simple cushion using the no-sew technique from The Sewing Room Channel. It's so easy and would be a great way to use up scraps and old clothes. Now I want to see if I can find some suitable fabric that doesn't fray that I can dye myself to make some original designs.


Sunday 7 October 2018

Gelli® Plate Image Transfer


At TAAMMI this month we were doing image transfer. I thought it was a good time to try out this Gelli® plate technique from Birgit Koopsen.


The process is super frustrating because it doesn't work with all magazines or all paints. Most of my images came from Australia Geographic. I found the best paint to use was Golden fluid acrylics. The prints come out with an aged look which I might use for art journals. I tried the technique on fabric but so far I've been unsuccessful.