Helen O'Hara – Community Artist – Joondalup, Perth, WA
Showing posts with label Collage. Show all posts
Thursday, 28 May 2020
100 Days Project - 53/100
This print started life as a very faint, partial, Gelli® mono-print. I've added acrylics, pastels and collage to make this new composition. Here is the before and after:
Wednesday, 27 May 2020
100 Days Project - 52/100
Today's print started life as a partial Gelli® mono-print in blues using a stencil. I think it was actually a clean up paper. It was overlain with mono-printing in black to highlight the main shapes. I used white acrylic to block out any sections I didn't like. Pastel and watercolours were added to the background to eliminate the hard edge of the Gelli® plate. Collage was added to the left vase and watercolour to the right one. Here is a before and after picture:
Tuesday, 26 May 2020
100 Days Project - 51/100
Today I took a Gelli® mono-print which had a lot of white space and improved it with collage and graphite. The vase is a left-over mask that has been used in other prints. Never throw these things away! I think it looks like a wizard's potion brewing room.
Wednesday, 22 January 2020
Summer Sketchbooks
Over the summer holidays I haven't had much time for art but here are a few sketchbook pages I'm working on. I'm using photographs (often of my previous artworks) collaged onto the page with paint, stencils, pens and other found papers.
Sunday, 16 June 2019
New Topic, New Sketchbook
Our next challenge for the 84 Contemporary Textiles Group is "Geographical". I've decide to narrow down that huge theme to international trade routes such as The Silk Road. I've been looking to modern day souks for inspiration along with, Islamic architecture, spices, ceramics and other items traded across the world.
The most photogenic spice is the star anise so I bought a packet and got photographing and drawing. I used my sketches to cut a new lino print block.
It's a new project so I'm starting a new sketchbook. I don't usually use spiral books because I don't like the separation the spine makes between the 2 facing pages. However this one was cheap and has fairly decent paper in it. I've given it a fabric cover so it's nice to handle now the plastic is covered up. The main disadvantage is that the A4 size includes the section of paper where the binding pierces through it so if I stick in a loose A4 page it's wider than the book. I've done quite a number of prints on loose paper which I've needed to trim down to make them fit.
Many of these pages are not finished yet but I thought you'd like to take a look at my work in progress.
These pages have pockets so I can store my pictures, photographs and templates.
Any mask or stencil I've cut out gets collaged into the book once I have finished with it. This page has a print on the left and the stencil used to make the print on the right.
Stencils on thick paper make great "window" pages.
Other pages have shapes cut into their boarder.
Tracings over photos are great for simplifying a scene. I've been colour mixing and sponge printing too.
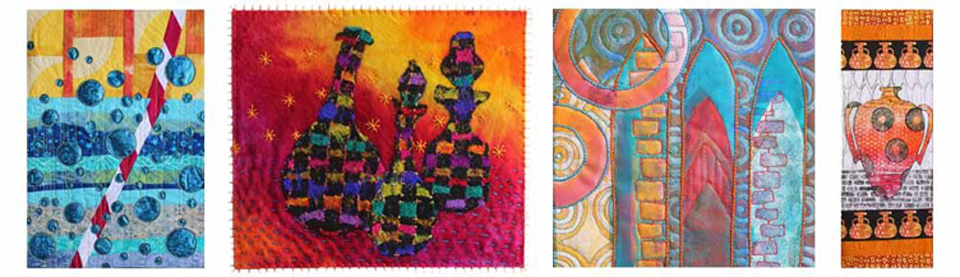
I'm now starting to take my ideas into textiles.
This design came from a tracing of various sketchbook elements. I've pieced the background from some hand dyed fabrics.
I've also been Gelli® mono-printing onto fabric.
This one has been stuffed from behind to give the vase a real roundness.
These are examples of reverse applique and slashing.
Of course I've kept the pieces I cut out to use on something else.
Check back soon to see what I come up with next.
Thursday, 30 May 2019
Fabric Sculptures Part 1
I'm busy preparing for my kids class next week where we will start making fabric sculptures. I like to be at least 1 step ahead of my students, so today I have been working on the background fabric layers for my example piece. I've used dyed, printed and painted fabrics that we made in class along with scraps of commercial fabrics and papers.
I'm working on a base of thick interfacing usually used in bags. The interfacing was covered with Bondaweb and fabrics laid on top collage style. When I was happy with the arrangement they were ironed into position. The next stage is to stitch all over it to secure everything permanently. I also used some thicker thread in the bobbin to add more texture and interest. You can see where the stitching is more easily on the back.
The next stage will be to cut them into sections to assemble into the sculpture.
I love this one (below) so much that I'm not sure yet if I will cut it or whether it will become a 2D picture instead.
I can't wait to see what designs the kids come up with.
Friday, 24 May 2019
Fabric Collage
A quick post today to show you this fabric collage. The background fabric is hand-dyed cotton. The flower and butterflies were appliqued on from commercial fabrics. There is also a piece of sari silk, scrim, ribbons and stitch. It's about 4 inches square.
Subscribe to:
Comments (Atom)

